Showing posts with label WINDOWS 7. Show all posts

Friday, 27 February 2015

How to use Your Pen drive as a Password in Windows 7

Computers are the most important storage area to store valuable files, documents and data, etc., for any individual person or an organization. Security is also necessary for these computers. So Security is most crucial for the computing world. Admin Password is not enough to protect your PC because hackers have various ways to hack your PC or they can easily steal your valuable data.
Today we learn a cool trick that is to carry your PC password with yourself. It means using Pendrive as PC password. Yes, it is possible to carry your PC password in pendrive. You can log into your PC by using pendrive as a password. There is no need to remember your password. Simply insert your pendrive and log into your PC without any password.
    The Beauty of this trick is it doesn’t need any software to install and nobody can log into your PC without inserting that pendrive. So that your data is safe and nobody can access it or harm it.
    Pendrive as PC Password
    So you need a pendrive to make as a password. Now follow these steps to make pendrive as PC password:-

    Pendrive as PC Password – Procedure

    • First insert a USB/pendrive into a PC and start it.
    • Right click on My Computer and select on Manage.
    • Computer Management window is opened and select Disk Management on left-hand side of this window.
    Pendrive as PC Password
    • Select your pendrive and click on Change Drive letters and paths.
    Pendrive as PC Password
    • Now click on Change and Select the drive letter as from the drop down box of change drive letter and paths window, click on OK.
    Pendrive as PC Password
    • Now open Run and type syskeyPress enter
    usb5
    • Startup Key The startup Key window is open and select on option StoreStartup Key on Floppy Disk then press Ok.

    Now your startup key is stored in pendrive and letter A is chosen forpendrive because the startup key is stored on a floppy which always represented as the letter A and B. And finally, when you start your PC you need to insert pendrive. Without Pendrive you will not able to access your computer. So keep this Pendrive as PC password Protected safe.
    If you want your default setting back, then follow the same steps and just chose option Store Startup Key Locally and press OK so that you will log into your computer without pendrive.
    Pendrive as PC Password
    Thank you for reading this post and you are free to ask your doubt in the comment section so that I solve your problem as soon as possible.

    Tuesday, 4 October 2011

    Partition Hard Drive Without Losing Data

    Before starting note that,

    - We can partition any drive, even a system drive

    - We can do it only in Windows, Windows 7 and Vista specifically

    So let’s divide it.

    Go to Start > Right click on My Computer and choose Manage.
    Disk Management Window will
    Pop-up, it may take time to load it since it fetches for all the
    hardware and system information in your PC. After it’s fully loaded, go
    to Storage> Disk management at the left sidebar. This is where we’ll
    have all the information about storage devices that are in our PC
    currently connected and active.

    At the right column all the storage media will be listed with their
    basic information like File system type, and status. Now choose the Volume that you want to partition. Right Click on it and select Shrink Volume option from menu.

    As soon as you click on the Shrink Volume option, system will search for available space in your selected Disk Volume.
    This will not take much longer than few seconds. After querying, Shrink window will pop-up. This is where you’ll have to specify the Volume for next partition.

    Look at the total size of available shrink space. Below it, you’ll have to Enter the space to shrink.you must make sure that the size is not below the total size of space taken by files in that drive.

    You can check the used space by right clicking on the drive you are going to partition and choose Properties.
    Click on Shrink button after specifying the size to shrink. The shrink
    size is for the value for the partition where your old files will be
    contained and remaining size will allocated for your next partition.

    But you’ll still not able to access this new drive. You’ll have to
    format it and specify the drive letter to access them. To do so,
    continue reading.

    Right click on unallocated drive and choose New Simple Volume option.

    New Simple Volume Wizard Window will popup.

    Click on Next button to continue.

    In next window, you’ll have to specify the size for your new volume.
    Set full size if you are satisfied with two partitions; else divide it
    again for new partition.

    Next choose any drive letter from the available list and click on Next button.

    In next window, leave everything as default but make sure it’s similar to the screen below:

    Click on Finish window to complete the wizard.

    If you’ve autoplay enabled in your computer, then New Volume will be auto played for the first and last time.
    With similar method you can also format your empty drive to create multiple partitions.

    Saturday, 2 July 2011

    Use Pen drive As RAM !!

    Here is the required procedure for converting USB/pendrive memory into RAM manually…

    1) Plug your pendrive into PC/laptop.

    2) Right Click On My Computer.

    3) Open up properties.

    4) Go to Advanced Option.

    5) Now select Settings of Performance.

    6) Again Click on the Advanced Button which is shown In the popup Window.

    7) Now click on Change button shown in Virtual memory.

    8) Now select the available memory of your removable USB/Pendrive.

    9) Set the value and apply the changes.


    ... yes it is possible all the memory available in a removable pendrive/USB can be converted into RAM to increase the working speed of the computer.


    Manual Method to Convert USB/Pendrive Into RAM ...


    10) Restart your PC/Laptop and Thus you are done.

    Sunday, 12 June 2011

    Cool Keyboard Tricks (Windows) : Make a Disco

    Keyboards usually have small LED's which indicate whether different types of locks are activated or not. Here is a trick to use the lights of your keyboard in a more creative manner in Windows.

    This trick uses a simple Visual basic script which when activated makes your scroll lock, caps lock and num locks LED's flash in a cool rhythmic way which gives the perception of a live disco on your keyboard.


    Keyboard tricks

    To make your own live disco, follow the steps given below:-

    1. Open Notepad.
    2. Copy paste the exact code given below:-

    Set wshShell =wscript.CreateObject("WScript.Shell")
    do
    wscript.sleep 100
    wshshell.sendkeys "{CAPSLOCK}"
    wshshell.sendkeys "{NUMLOCK}"
    wshshell.sendkeys "{SCROLLLOCK}"
    loop
    3. Save the file as Disco.vbs or "*.vbs".


    Cool Keyboard Tricks

    Double click on the Saved file to see the LED lights on your keyboard go crazy and make your own cool disco.

    This trick has been tested on Windows XP, Windows Vista and Windows 7 and found to be working perfectly.

    You can disable the keyboard disco by starting Task Manager and ending the wscript.exe process.T

    Password Protect/ Lock folders in Windows without any Software

    Most of us have private data. Not all of us have a private computer to keep that data. So, we just end up with other people viewing that data. Although password protecting software do work, it is almost useless to hide private data with these software(because we are always questioned as to what it is that we are hiding with the help of these software).

    Hidden folders do not work as they can be easily searched with Windows Search. So, we need an alternative way to create hidden password protected folders which only we can access. And that is exactly what we will learn in this post.

    With this trick, you can create a secure password protected folder in Windows which no one except you can access. To use this trick, follow the instructions given below:-
    1.  Open Notepad.
    2.  Copy and paste the exact code given below:-


    cls
    @ECHO OFF
    title basichackingtips.blogspot.com/
    if EXIST "Control Panel.{21EC2020-3AEA-1069-A2DD-08002B30309D}" goto UNLOCK
    if NOT EXIST MyFolder goto MDMyFolder
    :CONFIRM
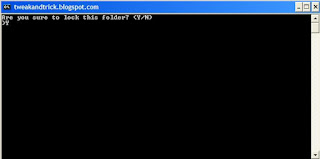
    echo Are you sure to lock this folder? (Y/N)
    set/p "cho=>"
    if %cho%==Y goto LOCK
    if %cho%==y goto LOCK
    if %cho%==n goto END
    if %cho%==N goto END
    echo Invalid choice.
    goto CONFIRM
    :LOCK
    ren MyFolder "Control Panel.{21EC2020-3AEA-1069-A2DD-08002B30309D}"
    attrib +h +s "Control Panel.{21EC2020-3AEA-1069-A2DD-08002B30309D}"
    echo Folder locked
    goto End
    :UNLOCK
    echo Enter password to Unlock Your Secure Folder
    set/p "pass=>"
    if NOT %pass%== basichackingtips.blogspot.com/ goto FAIL
    attrib -h -s "Control Panel.{21EC2020-3AEA-1069-A2DD-08002B30309D}"
    ren "Control Panel.{21EC2020-3AEA-1069-A2DD-08002B30309D}" MyFolder
    echo Folder Unlocked successfully
    goto End
    :FAIL
    echo Invalid password
    goto end
    :MDMyFolder
    md MyFolder
    echo MyFolder created successfully
    goto End
    :End


    Hide Folders without any Software


    3.  Click on the File Menu. Click on Save As.
    4.  Select All Types in the Save As Type dropdown menu. Save the file as *.bat or Locker.bat.


    After creating the file, double click on the Saved file. A new folder will be created. Enter your data in the folder. Again, double click on the batch file. Type Y and press Enter. The folder will be hidden from view.

    To re-view your folder, double click on the saved batch file. Enter password as "tweakandtrick.blogspot.com" without quotes and press Enter key. This is also the default password. Your folder will be visible again.

    To change the default password, edit the part of the code given in blue and enter your own password.

    The overall usability of this trick can be improved by deleting the batch file after hiding your folder and re-creating it when you wish to access your folder again.

    If you face any problem using this trick, you can write a comment and I will do my best to help you.

    Note: This works on Windows 7, Windows XP and Vista. First try this on useless data to be sure and then only hide your personal data

    Install, Boot Windows from USB Pen, Thumb or Flash Drive

    Normally, Windows is installed using optical media like DVDs and CDs but there are times when it is not possible to boot into the windows setup using disks probably because your DVD drive is not working or, if you are using one of those ultra-portable laptops, it is not there at all.


    Install Windows XP, Windows 7, Windows Vista from USB drive
    To overcome this problem, one can either use external disks and install windows normally or create a bootable pen drive (flash drive) to install Windows on the go. In this tutorial, we will discuss about the latter and learn how can we create a bootable USB drive for installing Windows XP, Windows Vista or Windows 7. Moreover, as installing Windows from a CD/ DVD is much slower than from a flash drive, installation will also take less time.

    This article assumes that your computer has a mother board which supports booting from USB drives. Most modern laptops and desktops support it. If you have bought your computer in the past 5 years, then you do not need to worry about this.


    Installation Requirements
    1. An empty Flash drive with a storage capacity of 1GB for Windows XP and 3GB for Windows 7, Windows Vista and Windows Server 2008.
    2. Windows Installation Disk or Windows Installation files stored somewhere on your computer.

    Steps to create a Bootable USB Flash Drive/ Pen Drive

    1. Download Win to Flash. The software is still in beta phase so it is possible that it has some bugs although I have personally faced none. The latest version of Win to Flash can be downloaded from here. To avoid this tutorial from getting outdated, I would advise to download the software from the former link.
    2. Extract the downloaded zip file to any folder on your desktop. 
    3. Open the folder and run WintoFlash.exe by double clicking on it.
    4. Click Next, check I accept EULA, click Next and Next again. Wait for the software to load some ads, click Next and Next again. 
    5. A welcome screen like one in the image below will show up.
    6. Install Windows USB Flash Drive
      Win to Flash welcome screen
    7. Click on the big green tick. The welcome screen will turn translucent and WinToFlash wizard will open.
    8. Bootable Windows XP, 7, Vista Pen Drive
      Wizard showing the various version of Windows it supports
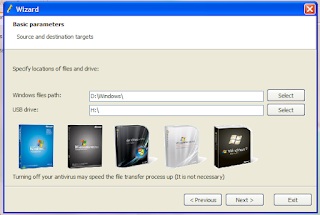
    9. Click Next. On Windows File path entry, click Select button and select the location of your Windows disk, or the folder containing the Windows setup files and click OK.
    10. On USB Drive path entry, select your USB flash drive's location and click OK.
    11. Click Next button. In the dialog box, encircle I accepted the license agreement and click Continue.
    12. A warning message will be displayed saying that Formatting will erase all data on the disk. Click OK in the message.
    13. WintoFlash will show a Windows with a progress bar like one in the image below.
    14. Bootable Windows 7, XP, Vista
      Preparing a bootable Pen Drive
    15. After the progress bar reaches the end, press Next and then press Exit. A notification to update WintoFlash might be shown, click No just close to close it.
    That's it. You now have a bootable pendrive that can be used to install Windows.

    Install Windows from the bootable USB pen drive/ flash drive/ Thumb Drive

    1. Plugin your thumb drive.
    2. Start your computer. Go into BIOS setup by pressing the delete key. In the boot menu, select your flash drive as the first boot device. Save Settings and Restart your PC. (This step might be different for different computers. Check your system guide to know how to change the boot order in your PC.)
    3. Windows setup will load.
    4. Install Windows by following instructions on the Screen.
    This tutorial works on all versions of Windows including Windows 7, Windows Xp and Windows Vista.

    Thursday, 19 May 2011

    GodMode Creator – Create shortcuts in Windows 7 & Vista

     You must have recently heard about the highly hyped GodMode in Windows 7 and Vista. This Godmode is actually ‘All Tasks’ which provides easy access to 278 items of Control Panel.

    GodMode shortcut can be created, by creating a new folder and name it as:
    God Mode.{ED7BA470-8E54-465E-825C-99712043E01C}
    GodMode folder

    Related Posts Plugin for WordPress, Blogger...
    Twitter Delicious Facebook Digg Stumbleupon Favorites More

     
    TRICKS AND TIPS CREATED BY SUSHIL UPADHYAY| Grants for single moms